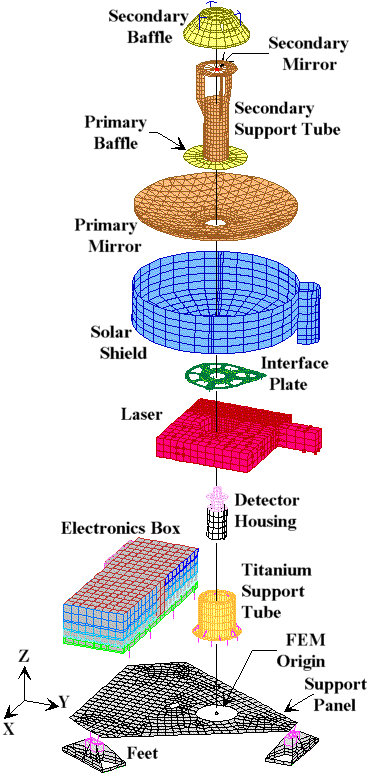
MOLA FEM Exploded View
The picture below is an image map. Just click on a component and it will take you to a short description.
If you miss, then you'll be shown the same picture again.
(Your browser must support HTML 3.0 using client-side mapping.)
Description of the Components
This view of MOLA-2 gives an excellent opportunity to describe in minor detail all the major components of the instrument. If you are interested in more specific mechanical information, jump to the MOLA FEM Information Page.
I will start at the top and work down. The origin of the model is located along the optical axis at the midplane of the Honeycomb Support Panel at the bottom. There is a dot at this location on the view above.
Telescope
The Telescope is comprised of the Primary and Secondary Mirrors, the Solar Shield, the Secondary Support Tube and the Secondary Baffle.
Secondary Baffle
Like the Solar Shield, the Secondary Baffle stops stray light from contaminating the laser light.
Secondary Mirror
Once the returning laser beam strikes the Primary Mirror, it bounces up to the Secondary Mirror. From here it is reflected down to the Detector Housing.
Secondary Support Tube
The Secondary Support Tube is what holds the Secondary Mirror and Baffle in place. It is also made out of very stiff Beryllium.
Primary Baffle
The primary baffle stops stray light from reflecting off the primary mirror outside the mirror's actual reflective area.
Primary Mirror
The Primary Mirror is the first mirror of the telescope that the laser light will hit as it returns from the surface. It is made from Gold-plated Beryllium.
Solar Shield
The Solar Shield is used to block any light that might be coming in from the side from being reflected onto the Primary and Secondary Mirrors. The Doghouse is the attached tube located on the right side of the shield in the picture.
Laser Housing
The Laser Housing holds all the laser equipment. The laser is aimed at the Martian surface using a mirror.
Interface Plate
The Interface Plate is the most important structrual component on the instrument. It is a very, very stiff plate, shaped sort of like a wheel, that is mounted on top if the Titanium Support Tube. Its primary function is to hold the Telescope, the Laser Housing and the Detector Housing in perfect alignment.
Detector Housing
The Dectector Housing holds the sensor that reads the laser beam once it has bounced back from the Mars surface and has been focused by the telescope.
Electronics Box
The Electronics Box (or E-Box as we say) holds the brains of the instrument. It is where all the computer components for MOLA-2 are located.
Titanium Support Tube
This Support Tube holds the MOLA-2 telescope above the support panel. When the instrument is assembled, the detector housing fits inside the Support Tube.
Support Panel
The MOLA-2 Support Panel is made of aluminum honeycomb with aluminum face sheets. It is 2 inches thick. (The picture above shows the panel as having almost no thickness, which is not the case.)
Feet
The Feet of MOLA-2 are machined from blocks of a magnesium alloy, ZK60A-T5. Each foot weighs about a half pound (quarter kg). They mount the instrument directly to the spacecraft.
FEM Origin
This is the model's origin, i.e., x=0, y=0, z=0.
If you have any questions about this instrument, mail them to me at the address below.
 Back to the FEM Pictures Page.
 Back to the MOLA Analysis Home Page.
 This page is maintained by Ryan Simmons, at RYAN@singollo.gsfc.nasa.gov.
This page was updated on March 26, 1996.